The Unplayable Ball Rule: Your Three Relief Options
Rule 19 explained: who can declare a ball unplayable, the three one-stroke options, the special bunker choices and the mistakes golfers make.
Sooner or later every golfer finds a ball wedged against a tree root, buried under a bush or sitting at the bottom of a steep-faced bunker. You can try to hack it out and risk making things worse, or you can use one of the most useful rules in the book: the unplayable ball rule. For a single penalty stroke it lets you move the ball to a place where you can make a sensible swing.
This guide explains Rule 19 of the Rules of Golf in detail: who decides that a ball is unplayable, where the rule can and cannot be used, how each relief option works, and the special options available in a bunker.
Who Decides and Where the Rule Applies
Rule 19.1 contains two simple but important principles.
Only the player decides. There is no objective test of “unplayable.” You do not need to prove the ball cannot be hit; you just need to decide that you would rather take a penalty stroke than play it as it lies. A ball sitting perfectly in the middle of the fairway can, in principle, be declared unplayable. Your opponent, your fellow competitors and the referee have no say.
Anywhere except a penalty area. Unplayable ball relief is available anywhere on the course: in the general area, in a bunker, on the putting green, even in the teeing area. The one exception is a penalty area. If your ball is in a penalty area and you do not want to play it, your only relief is penalty-area relief under Rule 17. Our guide to penalty areas, out of bounds and lost balls explains those options.
The Three Options in the General Area or on the Green
Under Rule 19.2, each option costs one penalty stroke. You choose one of the following.
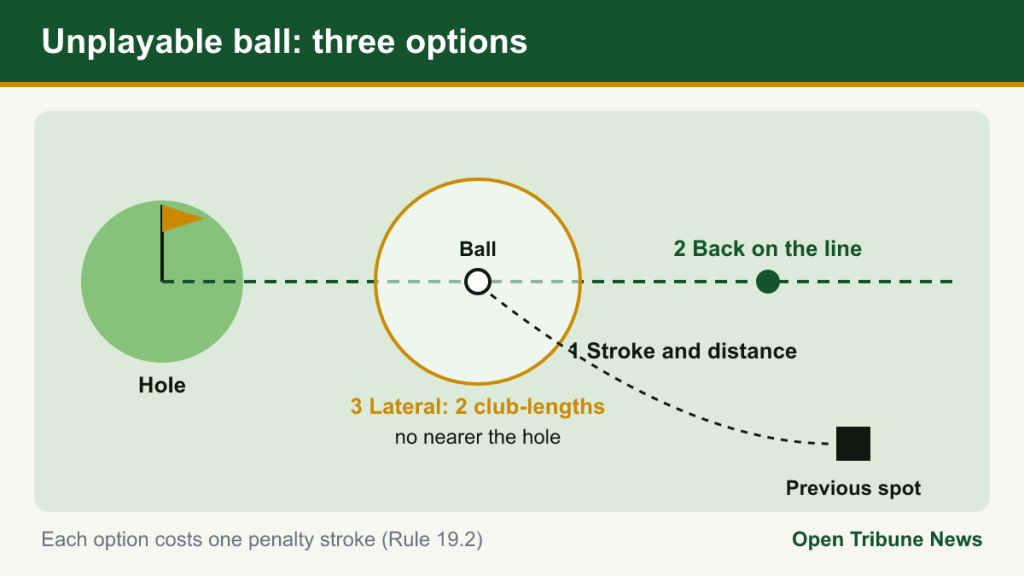
Option 1: Stroke-and-distance (Rule 19.2a)
You play the original ball or another ball from where you made your previous stroke, using the normal procedure for that area (for example, teeing the ball again if the previous stroke was from the teeing area, or dropping in the general area).
A distinctive feature of this option is that you do not need to find or identify the original ball. That makes it useful when you know your ball is somewhere in a thicket but cannot locate it within the search time; at that point, however, you would normally simply proceed under the lost ball rule, which also uses stroke and distance.
Option 2: Back-on-the-line relief (Rule 19.2b)
You drop a ball behind the spot of the original ball, keeping that spot directly between the hole and the place where you drop. There is no limit to how far back you can go.
The procedure works like this:
- Imagine a straight line from the hole through the spot where your ball lies, extending backward.
- Choose a point on that line and drop a ball so that it first touches the ground on the line.
- The relief area is one club-length in any direction from where the ball first touches the ground, but it must not be nearer the hole than the original spot, and the ball must come to rest in the same area of the course where it first touched the ground.
To use this option, you must know where the original ball is.
Option 3: Lateral relief (Rule 19.2c)
You drop within two club-lengths of the spot of the original ball, no nearer the hole. The reference point is the spot of the ball. If the ball is above the ground, for example lodged in a tree, the reference point is the spot directly below it on the ground. If more than one area of the course lies within two club-lengths, the ball must come to rest in the same area it first touched when dropped.
Again, you must know where the original ball is. A player using a wheeled mobility device may use a four-club-length relief area under the modifications in Rule 25.
Choosing the Right Option
| Situation | Usually best option | Why |
|---|---|---|
| Ball in a bush with open grass a few feet to the side | Lateral (two club-lengths) | Quickest route to a clean lie, close to where you were |
| Ball behind a tree trunk, open fairway behind it | Back-on-the-line | Lets you move straight back to a clear line to the green |
| Ball deep in trouble, with no good spot nearby and a good previous position | Stroke-and-distance | Returns you to a known good lie, e.g. the fairway |
| Ball stuck high in a tree you can identify | Lateral from the spot below, or back-on-the-line | Both use the point on the ground directly beneath the ball |
The best option also depends on what lies around you. Two club-lengths laterally may simply move you deeper into the same bushes; going back on the line may take you to a clearing. Walk around and look before you decide.
Unplayable Ball in a Bunker
Bunkers have their own version of the rule in Rule 19.3, because a ball buried under a lip or plugged in the face is a common problem.

The normal options, for one penalty stroke (Rule 19.3a)
You may use any of the three options in Rule 19.2, with one restriction: if you choose back-on-the-line or lateral relief, the ball must be dropped in, and come to rest in, the bunker. Stroke-and-distance takes you back to where you played from, which may be outside the bunker.
The extra option, for two penalty strokes (Rule 19.3b)
For a total of two penalty strokes, you may take back-on-the-line relief outside the bunker, keeping the spot of the original ball between the hole and the place where you drop. This option was added in the 2019 rules modernization and is valuable when you face a ball that is badly plugged in a deep bunker, or when you simply do not trust yourself to escape the sand. Players using a wheeled mobility device have this option at a one-stroke penalty under Rule 25.
Weighing the bunker options
- A ball plugged deep in the face of a greenside bunker: dropping back on the line inside the bunker may give you a fair lie for one stroke, provided the bunker is large enough.
- A small pot bunker where any drop will roll back under the lip: paying two strokes to drop outside the bunker can be the cheaper outcome.
- A bunker shot from a poor lie that you feel confident about: sometimes the best option is to play it as it lies and accept a less ambitious target.
Unplayable on the Putting Green and Teeing Area
Unplayable relief on the putting green is rare, but it is allowed and follows Rule 19.2. In practice, when a ball on the green is affected by something like temporary water, players use free relief under Rule 16 instead.
On the tee, if your tee shot goes only a few yards into thick rough, the stroke-and-distance option means playing again from the teeing area, and you may tee the ball up. You will lie three after that stroke.
What If the Dropped Ball Ends Up in Another Bad Spot?
There is no guarantee that the drop will give you a good lie. Once a ball dropped under Rule 19 comes to rest in the relief area, it is in play, even if it settles in another difficult position. If that happens, you may declare it unplayable again, taking another penalty stroke and any of the available options. That is why it pays to look carefully at the relief area before choosing where to drop.
Common Mistakes
- Trying to use Rule 19 in a penalty area. It is not allowed; use Rule 17 instead.
- Dropping nearer the hole. Neither the lateral nor the back-on-the-line option allows you to finish nearer the hole than the reference point.
- Using lateral or back-on-the-line relief without knowing where the ball is. Both require the spot of the original ball. If you cannot find it, only stroke-and-distance is available.
- Dropping outside the bunker for one stroke. The one-stroke back-on-the-line and lateral options must stay in the bunker; leaving the bunker costs two strokes.
- Measuring with the putter. A club-length is measured with the longest club in your bag other than the putter.
- Dropping from the wrong height. All drops are made from knee height, letting the ball fall straight down without throwing or spinning it.
- Playing from a wrong place. If you drop or play outside the permitted relief area, you incur the general penalty (two strokes in stroke play, loss of hole in match play) under Rule 14.7a.
For an overview of the broader principles behind rules like this, see our guide to the essentials of the Rules of Golf.
Worked Example
On a par 4, your second shot finishes under a dense evergreen 30 yards short of the green. You can see the ball but cannot make a backswing.
- Lateral: two club-lengths to the left takes you onto open grass. You drop there, playing your fourth shot (two strokes plus one penalty) with a clear pitch.
- Back-on-the-line: moving straight back from the hole would take you through more trees, so this option is less attractive here.
- Stroke-and-distance: you would return to the fairway where you played your second shot, also hitting four, but from much farther away.
Lateral relief is clearly the best choice. The penalty is the same in every case; what differs is where you play the next shot from, and that is where good decisions save strokes.